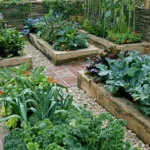
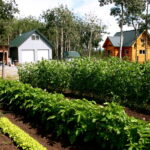
Creating a raised garden bed is one of the most effective ways to grow vegetables, herbs, and flowers in almost any outdoor space. Whether you’re working with a small yard, poor soil, or simply want to make gardening more accessible, constructing your own elevated planter offers flexibility and control over your growing environment. This guide will walk you through the essential steps, materials, and tips for building a sturdy, productive raised bed that can transform your gardening experience.
Raised beds allow for improved drainage, better soil quality, and easier weed management. They’re also a great choice for beginners and experienced gardeners alike. If you’re new to this approach, you may also find helpful advice in raised bed gardening for beginners, which covers setup basics and ongoing care.
Why Choose a Raised Bed for Your Garden?
Opting for an elevated planter offers several advantages over traditional in-ground gardening. Here are some of the key benefits:
- Improved Soil Quality: You control the soil mix, which is especially helpful if your native soil is rocky, clay-heavy, or contaminated.
- Better Drainage: Raised beds drain more efficiently, reducing the risk of root rot and other water-related issues.
- Fewer Weeds and Pests: The defined borders make it easier to manage weeds, and you can implement barriers to deter pests.
- Accessibility: Elevated beds reduce the need for bending and kneeling, making gardening more comfortable for people with mobility challenges.
- Extended Growing Season: Soil in raised beds warms up faster in spring and can be covered more easily in fall.
With these advantages, it’s no surprise that many gardeners are turning to this method for growing healthy, productive plants.
Planning Your Raised Bed Project
Before gathering materials, take some time to plan your project. Consider the following factors to ensure your raised bed meets your needs:
- Location: Choose a spot that receives at least 6–8 hours of sunlight daily. Avoid areas with standing water or heavy shade.
- Size: Common dimensions are 4 feet wide by 8 feet long, with a height of 12–24 inches. Keep the width manageable so you can reach the center from either side.
- Materials: Rot-resistant woods like cedar or redwood are popular choices. You can also use composite boards, bricks, or galvanized metal kits.
- Soil Mix: Plan to fill your bed with a blend of topsoil, compost, and other organic matter for optimal plant growth.
For those working with limited space, you may also want to check out beginner gardening tips for small yards for additional layout ideas and space-saving solutions.
Materials and Tools You’ll Need
Gather all necessary supplies before you begin construction. Here’s a basic list for a wooden raised bed:
- Rot-resistant lumber (e.g., cedar, redwood, or pressure-treated pine)
- Galvanized screws or exterior-grade wood screws
- Drill and drill bits
- Measuring tape and pencil
- Level
- Shovel or garden fork
- Landscape fabric (optional, for weed prevention)
- Soil and compost
Adjust the list if you’re using other materials, such as metal or stone. Pre-made kits are also available for those who prefer a simpler assembly process.
Step-by-Step Instructions for Building Your Bed
Follow these steps to construct a durable and productive garden bed:
-
Measure and Mark the Site:
Use stakes and string to outline the area where your bed will go. Check for level ground and clear away grass or weeds.
-
Cut and Prepare the Boards:
Cut your lumber to the desired length and width. Sand any rough edges to prevent splinters.
-
Assemble the Frame:
Position the boards in a rectangle and screw them together at the corners. Use a level to ensure the frame is even.
-
Place the Frame:
Set the assembled frame on your prepared site. Check for level again and adjust as needed.
-
Prepare the Ground:
Loosen the soil inside the frame with a shovel or fork. For extra weed protection, lay down landscape fabric before adding soil.
-
Fill with Soil:
Mix topsoil, compost, and other amendments, then fill the bed to within a couple of inches from the top.
-
Water and Settle:
Water the soil thoroughly to help it settle before planting.
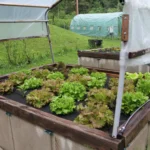
Filling and Planting Your Raised Bed
Once your frame is in place and filled, it’s time to start planting. Here are some tips for getting the most out of your new garden bed:
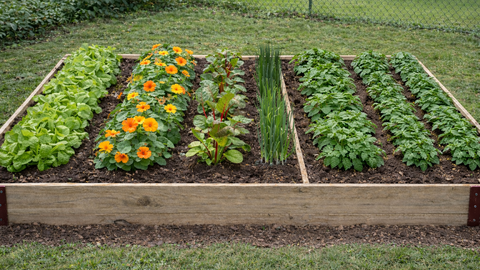
- Soil Mix: A blend of 60% topsoil, 30% compost, and 10% soilless amendments (like peat moss or coconut coir) creates a fertile, well-draining environment.
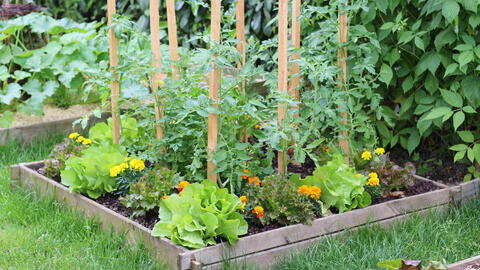
- Plant Selection: Choose crops suited to your climate and sunlight. Leafy greens, tomatoes, peppers, carrots, and herbs all thrive in raised beds.
- Companion Planting: Maximize space and deter pests by grouping compatible plants together. For more on organic growing, see how to grow vegetables organically.
- Watering: Raised beds dry out faster than in-ground gardens. Use a soil moisture meter to monitor hydration and water as needed.
Maintaining Your Raised Garden Bed
To keep your garden thriving, regular maintenance is key. Here are a few ongoing tasks:
- Mulching: Apply a layer of mulch to retain moisture and suppress weeds.
- Fertilizing: Add compost or organic fertilizer each season to replenish nutrients.
- Pest Management: Inspect plants regularly for signs of pests. For safe, effective solutions, explore natural pest control for vegetable plants and how to prevent pests in vegetable garden.
- Crop Rotation: Change plant locations each year to prevent soil-borne diseases and nutrient depletion.
With just a little routine care, your raised bed will provide abundant harvests season after season.
Common Mistakes to Avoid
Even experienced gardeners can run into challenges. Here are some pitfalls to watch for:
- Using the Wrong Soil: Avoid filling your bed with only native soil or heavy clay, which can restrict drainage and root growth.
- Overwatering or Underwatering: Raised beds dry out quickly, but overwatering can also cause problems. Use a moisture meter for best results.
- Building Beds Too Wide: If you can’t comfortably reach the center, maintenance becomes difficult. Stick to a maximum width of 4 feet.
- Neglecting Sunlight Needs: Place your bed where it will receive adequate sunlight for your chosen crops.
Planning ahead and following best practices will help you avoid these common issues and achieve a productive garden.
Additional Resources and Inspiration
For more detailed advice on starting your vegetable garden, you might find this comprehensive vegetable gardening guide helpful. It covers everything from planning and planting to harvesting and troubleshooting.
With the right preparation and care, building your own raised bed can be a rewarding project that delivers fresh produce and beautiful blooms for years to come.
Frequently Asked Questions
What is the best wood for a raised garden bed?
Rot-resistant woods like cedar and redwood are ideal because they last longer and resist decay. Pressure-treated lumber can also be used, but make sure it’s safe for food crops. Composite materials and metal kits are good alternatives if you want a longer-lasting, low-maintenance option.
How deep should a raised bed be?
Most vegetables grow well in beds that are 12 to 24 inches deep. Shallow-rooted crops like lettuce and herbs can thrive in beds as shallow as 6–8 inches, but deeper beds provide more room for root development and better moisture retention.
Do I need to line the bottom of my raised bed?
Lining the bottom with landscape fabric can help prevent weeds from growing up into your bed while still allowing for drainage. Avoid using plastic, as it can trap water and lead to root rot. If you have issues with burrowing pests, hardware cloth can be added as an extra barrier.